MailerLite is an inexpensive email tool with a sophisticated free version that gives you all the essential basic features you need. With this free version, you can send emails, create landing pages, create a website, pop-ups, and forms, or create automated sequences.
Working with this tool is very simple and clear.
Pros and cons
Pros:
- great free version – FREE REGISTRATION HERE
- ability to create forms, websites, landing pages, autoresponders, and send emails all in one place
- easy work with contacts
- easy work with editors
- clarity and simplicity
- multiple campaign formats
- very high-quality templates
- wide possibilities of connection to other systems (there are more off the list, but google them beforehand to check)
- low price
- easy to learn
Cons:
- lengthy registration
- for A/B tests, you can only test 2 variants against each other
- the web and landing page editor is simple but not so flexible
For whom it is suitable and for whom it is not suitable
The tool is suitable for beginners and for those not having a big budget. Here, you can find everything a small and medium-sized company needs and the work is very easy. However, I would recommend the tool even to less technical people as it is all very intuitive with several tutorials. MailerLite is one of the cheaper tools, and the free version contains sufficient features.
MailerLite is not for those who need more complex features (such as automation connected to multiple channels). For more complex functions, we recommend Activecampaign, which is more expensive.
Friendliness and features
Registration
Registration in MailerLite is more complicated. You must enter your company name, email, and password at the start. Then you complete your profile, where you enter your name, company details, etc. You can see the information required in the picture and how many fields need to be filled.
But it doesn’t stop there. Once filled out, you have to ask for approval where you enter your website or social media profile (I tried entering a nonsense URL here, and the account was approved).
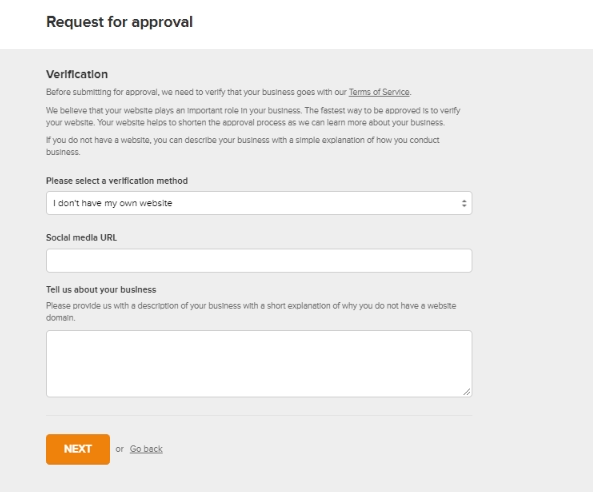
Registration is quite demanding, but it can be completed even if you make up the information (this is not a recommendation, just a feasibility statement).
Sample environment, dashboard
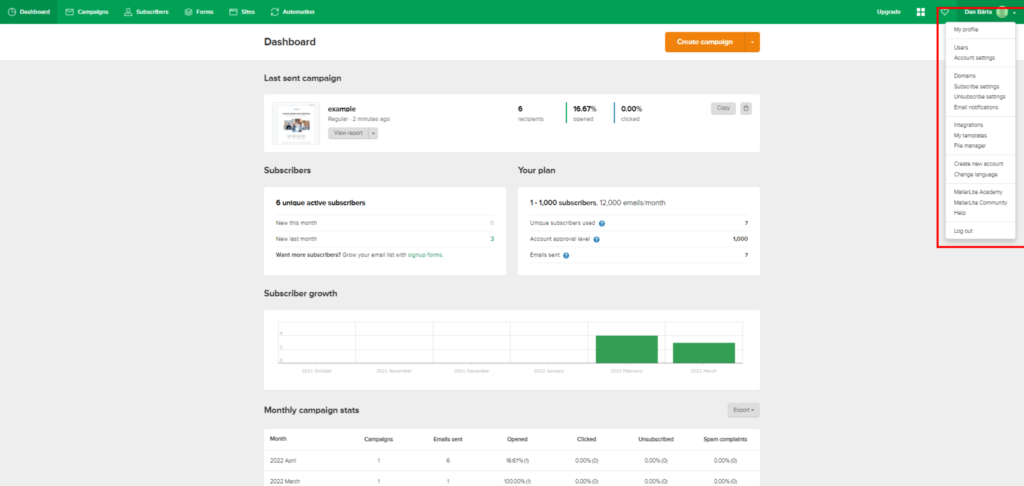
The reports are unclear; they are always in a specific category for each campaign. On the Dashboard, you can find only basic reports.
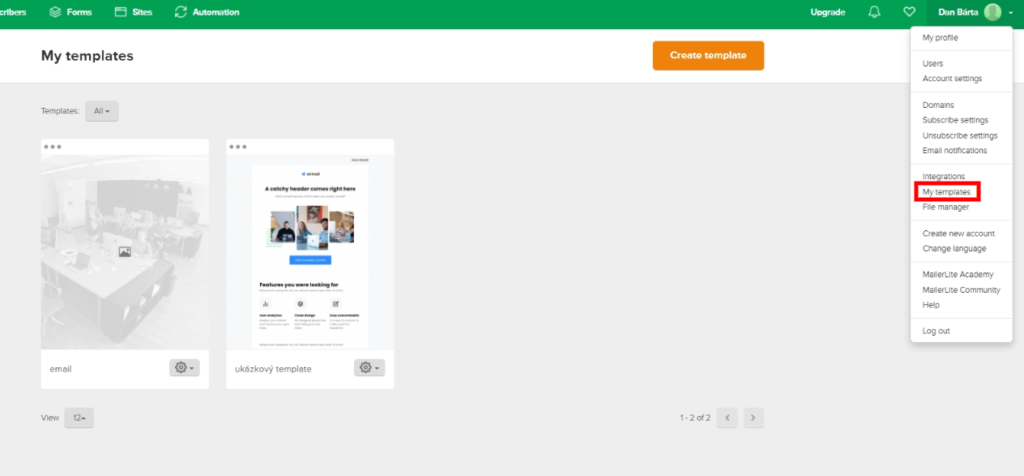
I would also criticize that some things are hidden in the “beak” next to your account name. Administrative activities like integration and account setup make sense here. But you will also find your templates and media folder, which don’t make much sense anymore. Otherwise, everything is where I would expect it to be.
How to import contacts
It may come as a bit of a surprise that there is no Import Contacts button but
Add Subscribers. However, it is the same function. You can import your contacts
- via CST or TXT file
- directly from Excel
- manually
- by linking to MailChimp
Linking is very easy and takes no more than 5 minutes just in case you want to read everything. In the free version of MailerLite, you can have up to 1000 subscribers and a maximum of 12,000 emails sent/month.
When importing, you must specify the group to which the contacts are to be inserted. These can be further segmented. MailerLite automatically cleans lists of duplicates when importing and also asks you what each column means.
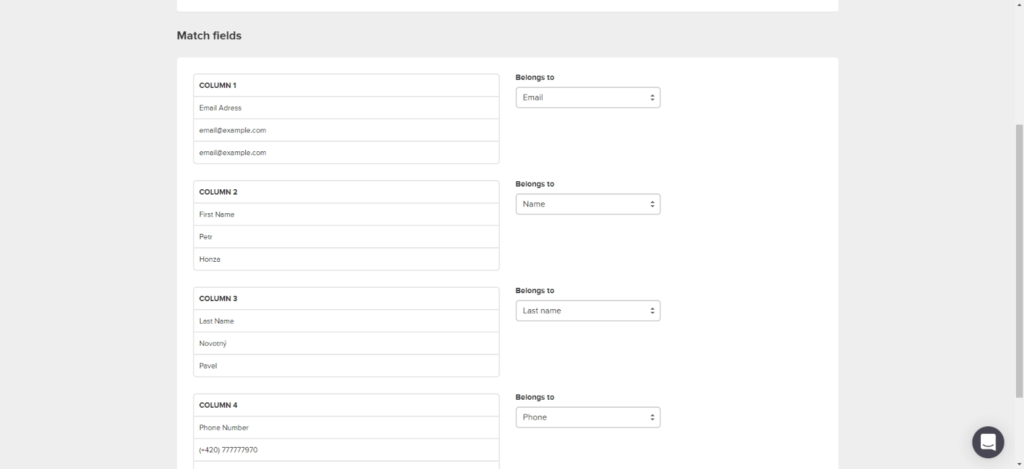
Import is very easy. There is also an option to import only one contact. When you import a single contact, you will see a field that you simply fill in.
If an error occurs, you will immediately know in the MailerLite interface where the error occurred and why the contacts were not imported. This is definitely better than the email you get when you fail to import your contacts in
MailChimp.
Working with contact lists
All work is done in the
Subscribers tab. You can create groups, segmentations, and new/custom contact fields. There is also a
Stats section, where MailerLite gives you the option to view overall statistics or individual group statistics. You also can clean the list from inactive users; this is especially handy in the case of the free version.
Segmentation
To create segments, see the Subscribers tab in the
Segments section. Here, you put the Create segment. Segments are created using rules
“and” or “and” functions. When you create rules, MailerLite automatically shows you how many contacts a segment will contain.
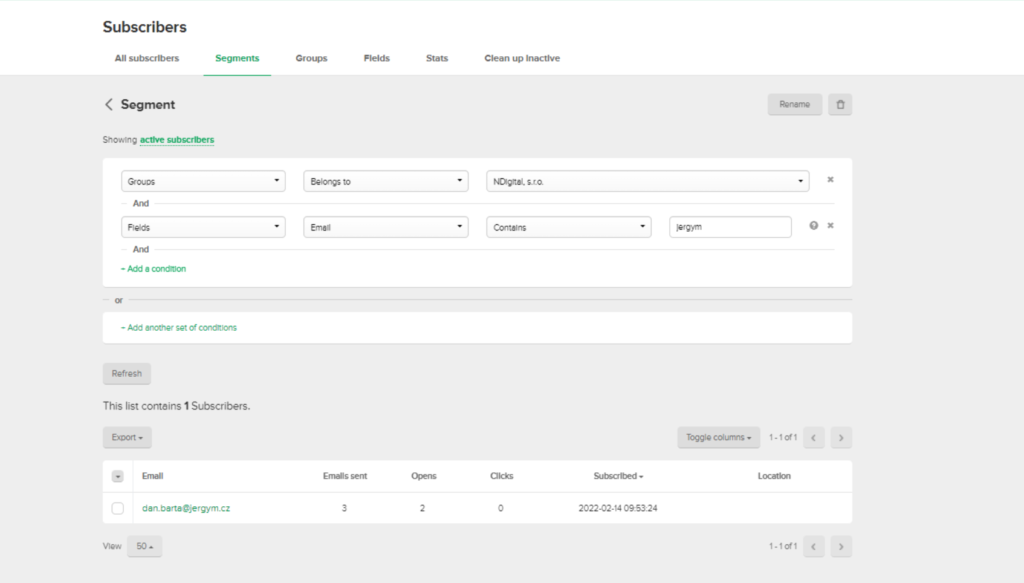
Creating segments here is one of the easiest things. It’s easy to understand, simple, and you can automatically see if it works without having to press any preview button. You can also edit segments after they have been created.
You also have the option to create Groups. You can then import contacts into these groups (e.g., via forms) and segment them further. Creating groups is very important because, on pages, forms, and landing pages, you specify which groups the subscribers will be subscribed to.
Search for specific emails
You can find the contact search under the
Search all subscribers button in the Subscribers tab in the All subscribers section. In MailerLite, you can search for contacts by name or email. It sounds like there’s little information to find a contact, but on the other hand, MailerLite will at least tell you.
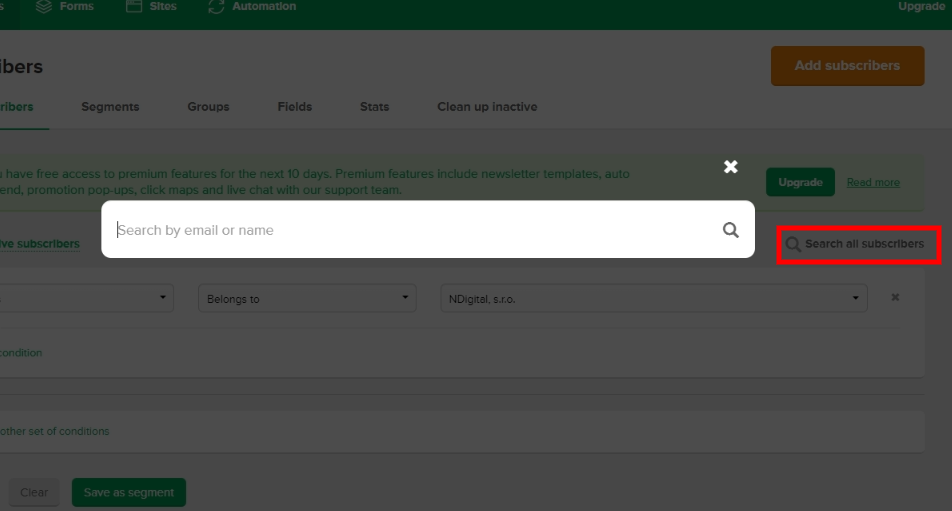
Some may find it annoying that the search box is not visible at first sight, but this is just a detail. The search is very fast. When you enter a search query, you will see the contacts found and how many have been found.
Contact detail description
You can access the product details by clicking on one of the contacts. In the description, you can find everything you need. In addition, you can edit individual information via the
Edit button next to the Subscriber details section. Here, you can see information about which of your groups the contact is a member of. MailerLite will also show you its activity and basic statistical information such as open rate, click rate, and how many emails were sent to it.
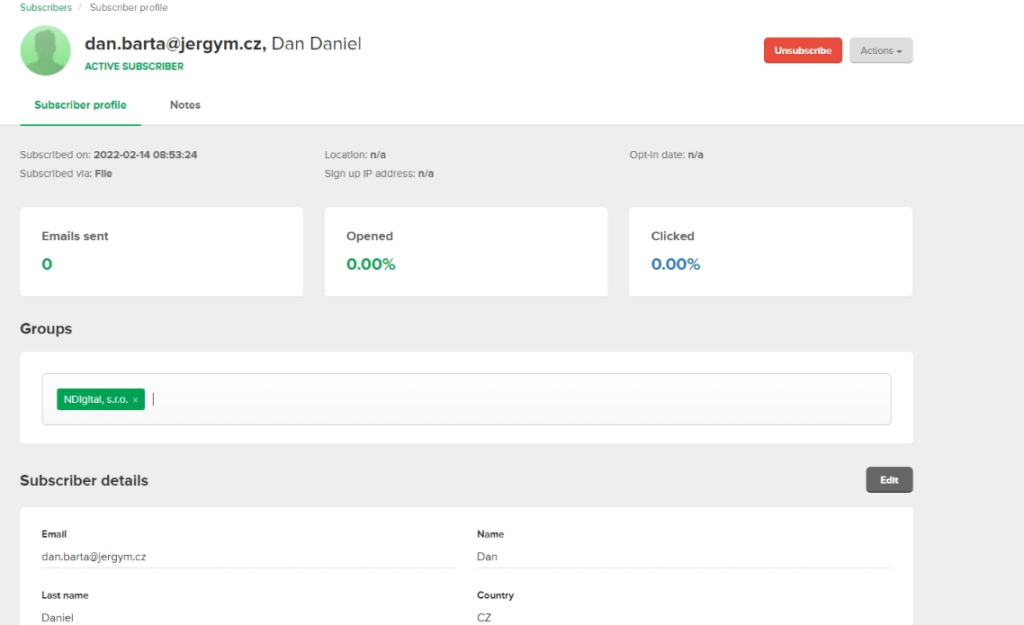
You can also create notes for individual contacts. This is especially practical in the B2B sector, where you need to know every client.
Forms
You can create forms in MailerLite. You can then collect emails in them or use them in other ways.
It is divided into three categories:
- Pop-ups,
- Embedded forms
- and Promotions.
When setting up pop-ups, you need to set which group the contacts are assigned to. When creating a classic pop-up window, you have 24 templates to choose from.
However, you can easily change the form in the editor, and it is really easy to work with. In my opinion, this is the best editor I have seen for email tools.
In addition to the ability to edit preset elements, you can add new blocks (e.g., countdown).
After creating a pop-up window in the editor, you can set its behavior. Here, you can set how long it takes to display or where the user must go on the page for the window to appear. It can also be set to display before the page closes, but of course, this doesn’t work on mobile phones. You can also set the display frequency for a single user, set whether it will start displaying immediately or, for example, in a week. This can come in handy when you plan a webinar and want to have a preset pop-up window.
Another option is to set which devices the pop-up will be displayed on. This gives you the ability to combine pop-ups. For example, set a pop-up window before the page closes for desktop and a pop-up window after 5 seconds on the page for mobile phones. You can also set it to display/not display on some of your specific pages.
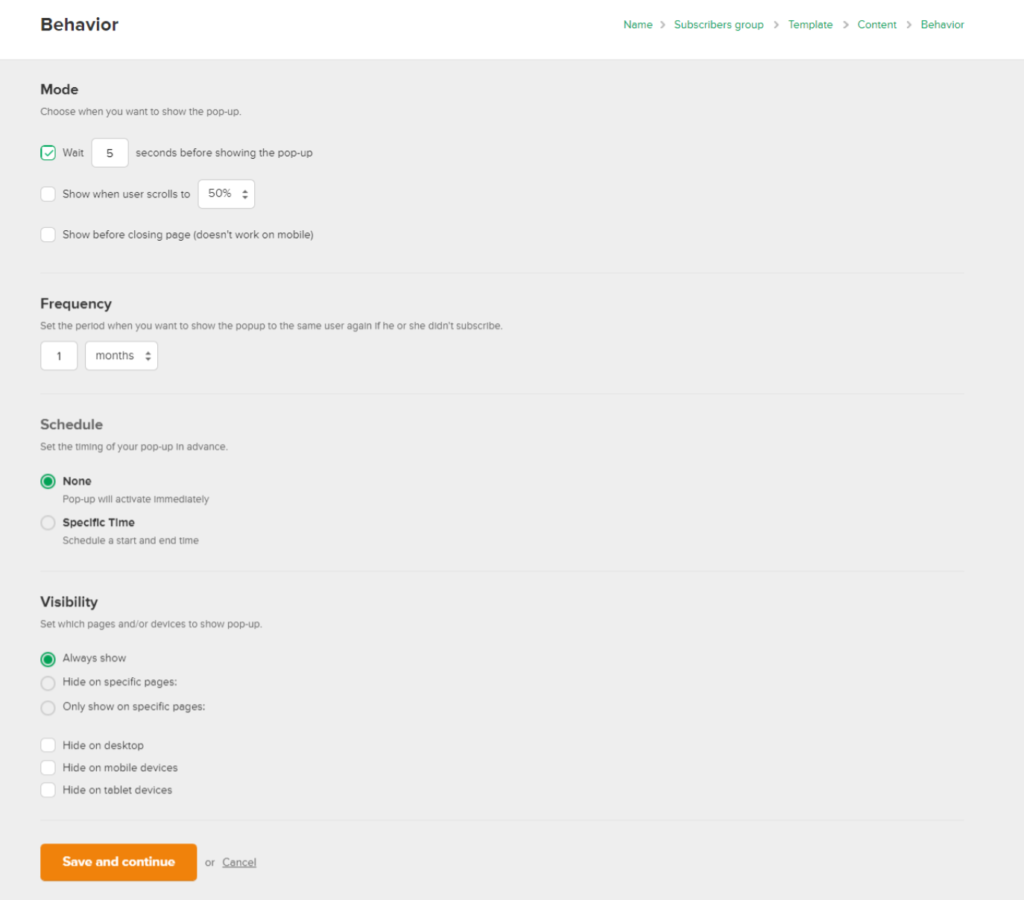
After setting up this technical stuff, you will see the HTML code with instructions on how to implement it. I like that it is displayed here in a meaningful way and not like Ecomail in the form editor. And you will also see an option to set up code if you want a pop-up to appear when you click on an element. You can then simply upload the pop-up window to your website.
You can also create an
Embedded form to collect contact information. The editor is very simple; you just add the contact information fields and edit them. Of course, you can also edit the form itself. However, you don’t choose from templates here, and it’s completely up to you. In addition, you will get a link that you can use as a landing page.
You can also create promotions to keep users on the site longer or promote a special offer (this is a paid feature). If you want to read more about them, the
MailerLite help article is here.
Tutorials on how to run them and a more detailed description can be found
here.
Editor for email content creation
You can access the templates in the campaign creation or in the drop-down bar next to your account name in the
My templates section. Here, you can click the
Create template button
, which takes you to the editor. Templates can also be saved and modified retrospectively.
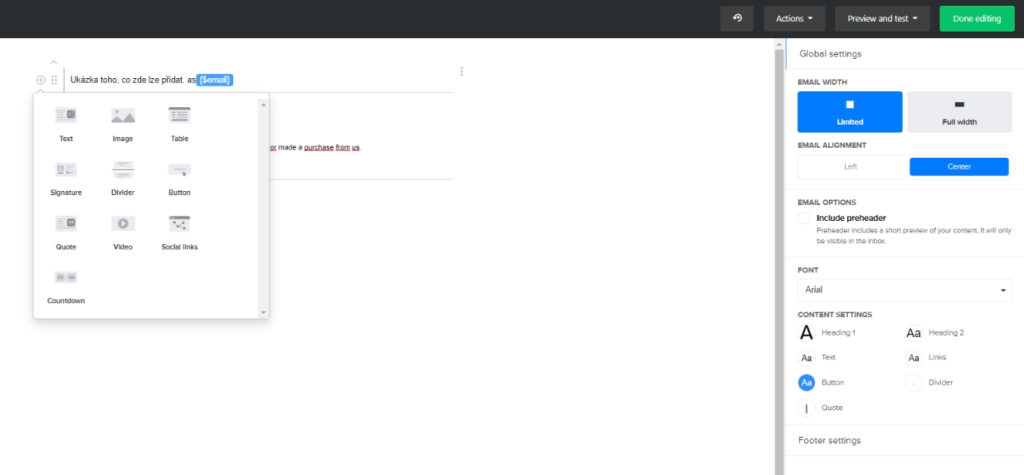
When creating an email, you can choose from 78 templates or use a
drag & drop editor, which is meant to be a “build it yourself from scratch” approach. In practice, it’s a template that you edit yourself.
Unlike the web editor, the blocks you insert into an email appear on the left side. You can have them displayed by category, which saves a lot of time. You can see the text editing on the right-hand side. Here’s a little difference between the web editor and the email editor in MailerLite. In the web editor, you can edit the format directly above the font, and here, you will see a box on the right side. In that field, you cannot change, for example, the type of heading, which is preset for each block. You must then change the headings through the
Content settings in the settings outside the blocks.
The big advantage is a really wide selection of preset blocks and their relatively simple setting. On the other hand, editing text can be a bit annoying because you have to click on the text and then go to the text box that appears on the right. It would be much more pleasant if one could just start writing straight away. Also, switching between settings is a bit clumsy. Instead, exit the block settings via the
save and
cancel buttons.
This will allow you to add additional blocks or set common block properties (such as a common font format across blocks). It would definitely save work if you didn’t have to save every step and just click in the place where there is no block to get out of its settings. Another feature is the implementation of variables, which basically work by inserting the recipient’s contact information behind them. Once you are done, just click the
Save as template button, and your template is ready.
Rich-text editor
It is used primarily for emails, which are mostly text-based, and there is no need for a larger number of elements. Here, you can insert personalized content into the text (here named
Variables), through which you can dynamically insert information about the contact who will receive the email.
The editor looks and works a little differently than the normal one. Apart from the fact that its functions are more text-oriented and you can change headings, adding new blocks is shown next to the existing ones, and there are fewer of them. MailerLite practically offers you the most important ones here. Changes to common elements are still on the right.
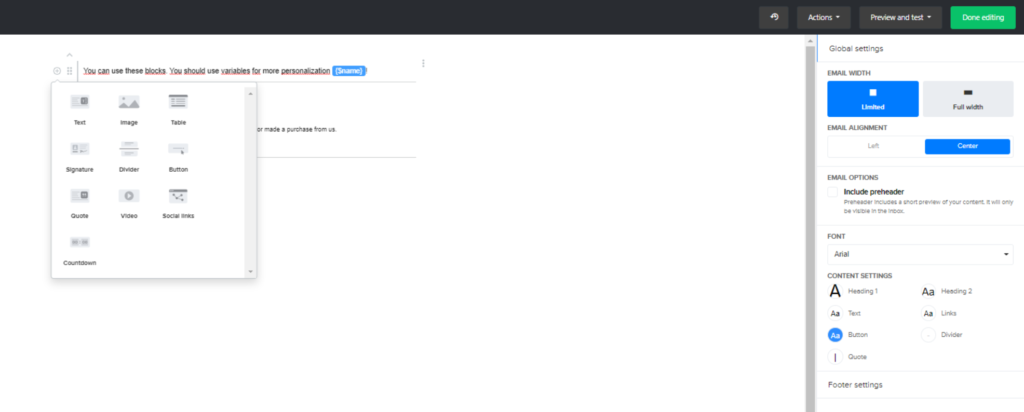
Working with the editor itself is simple. And text edits are displayed here as they should be in a normal email editor, i.e., above the marked text. Settings for blocks other than text blocks will appear on the right. Blocks can be scrolled using the scroll bar next to the + symbol to add new blocks. But what bothers me in this editor is that I can’t figure out how to change the background color. And I assume that if it’s not in Global settings, MailerLite doesn’t offer it either.
Creating campaigns
Campaigns can be found in the
Campaings section and in the
Dashboard. Here is a big
Create campaign button. It includes a drop-down bar that hides the types of campaigns that can be created. However, if you don’t choose here, you can also choose by clicking on
Create campaign. You can choose from the following campaigns:
- Regular campaign,
- A/B split campaign,
- Auto re-send campaign,
- RSS campaign.
What’s practical is that the common information across campaigns overwrites the information as you click through them. This is great if you forget to change your campaign type or change your mind.
Regular campaign (standard campaign)
A standard campaign is created in a few clicks. After selecting it, just enter:
- name (this is for you only)
- an object that you can personalize and put emoticons in it
- sender’s name
- the email it came from
- language
Then, in the next step, select the content. Here, MailerLite gives you a choice of your templates, creating a new one from its templates and recent emails.
Creating your template means modifying an email template you created, creating a campaign in a rich-tech editor, or uploading your HTML.
Think wisely about your choice of variant; I haven’t found where MailerLite gives the option to change the variant. However, you can edit its contents retrospectively. And of course, you can send a test email and check out the preview. When you subsequently process the content of the email, it can either click
go back or
done editing. The first option saves the email you created and returns you to a preview of the previous settings, which you can still change. The second one sends you straight to the segment to which you want to send the email.
You can choose from basic, advanced, and legacy settings when selecting which contacts to send the email to. In basic settings, you can choose between all groups, individual groups, or segments. You can individually uncheck them as checkboxes. For advanced settings, you simply type the conditions for segment creation, and a campaign is sent to contacts that meet the conditions. In legacy, you only select from groups, which can be useful if you have a lot of contacts.
Creating a standard campaign is very simple in MailerLite. However, it can also be handy to see what options it gives you in terms of choosing which contacts to send the campaign to. Thanks to the advanced settings, you can create individual segments and do not have to prepare them in advance.
MailerLite will then show you your settings (which you can still change) and then move on to campaign planning. You have three options:
- Send immediately.
- Send later (you set the time and time zone).
- Send by time zone (must be set 24 hours in advance and it’s in the paid version).
You can then view the campaign statistics in the
Campaigns section of
Sent in a specific campaign via the
View report button.
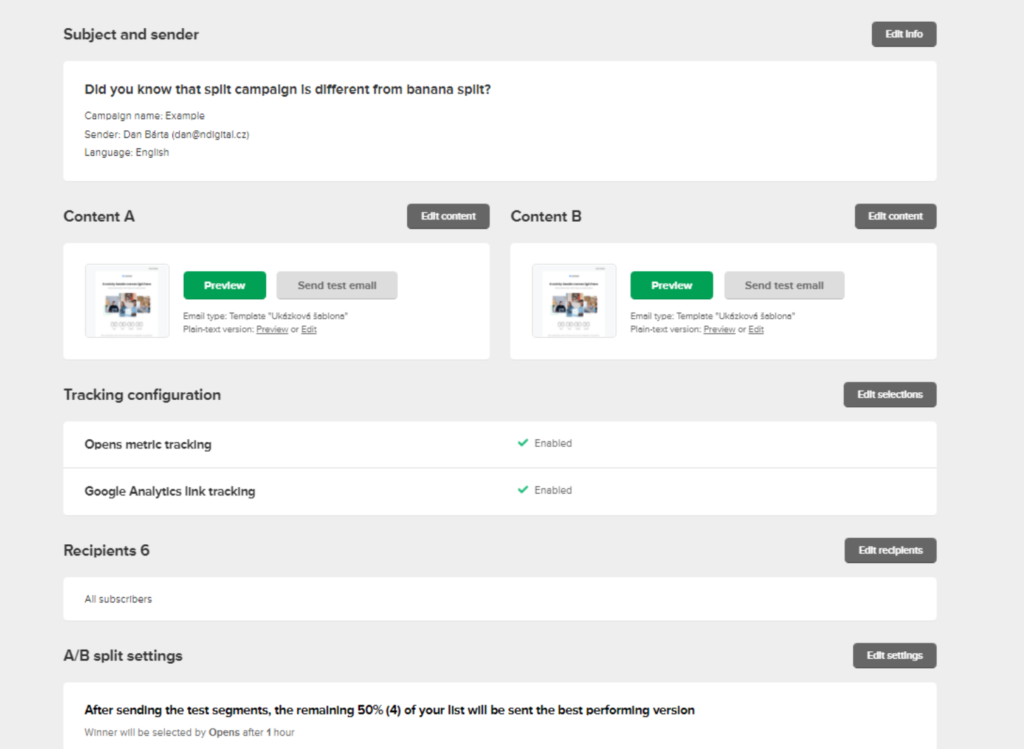
A/B testing campaign
For A/B testing, you only have the option to send two options. You can set
- various items
- from whom the email came (sender’s name and email)
- the content of the email.
You can always put two variants against each other, and you cannot combine two items with two other contents.
The steps are the same as for creating a standard campaign. So, if you’re testing the subject and name, you set the versions right at the beginning. If you’re testing content, you change it in the section where you add the email. Instead of
Done editing you have
Edit version B button. You have the same options as for editing a standard campaign, so you can test
rich-text against each other with a normal email. For editing the second one, there is already a
Done editing button.
Instead of planning a campaign, you can set how the winner will be announced (only the click-through and open rate option). You can also set how large a sample will be tested. For an A/B test campaign, you need at least four contacts in MailerLite. After evaluation, the winning combination is sent to the rest of the contacts. Then you can only set the time of sending (you cannot set the time-by-time zone)

The great thing about MailerLite is that A/B testing is free and easy to set up. However, I miss testing the send time and the ability to manually evaluate the results and then send them. Also, there are too few variants to test, but on the other hand, it doesn’t make much sense to test dozens of combinations.
Auto re-send campaigns
This type of campaign works by re-sending the campaign if the recipient did not open the previous email or click any links within the email. You can choose what is different about the second campaign to make it stand out for those who haven’t opened the first one.
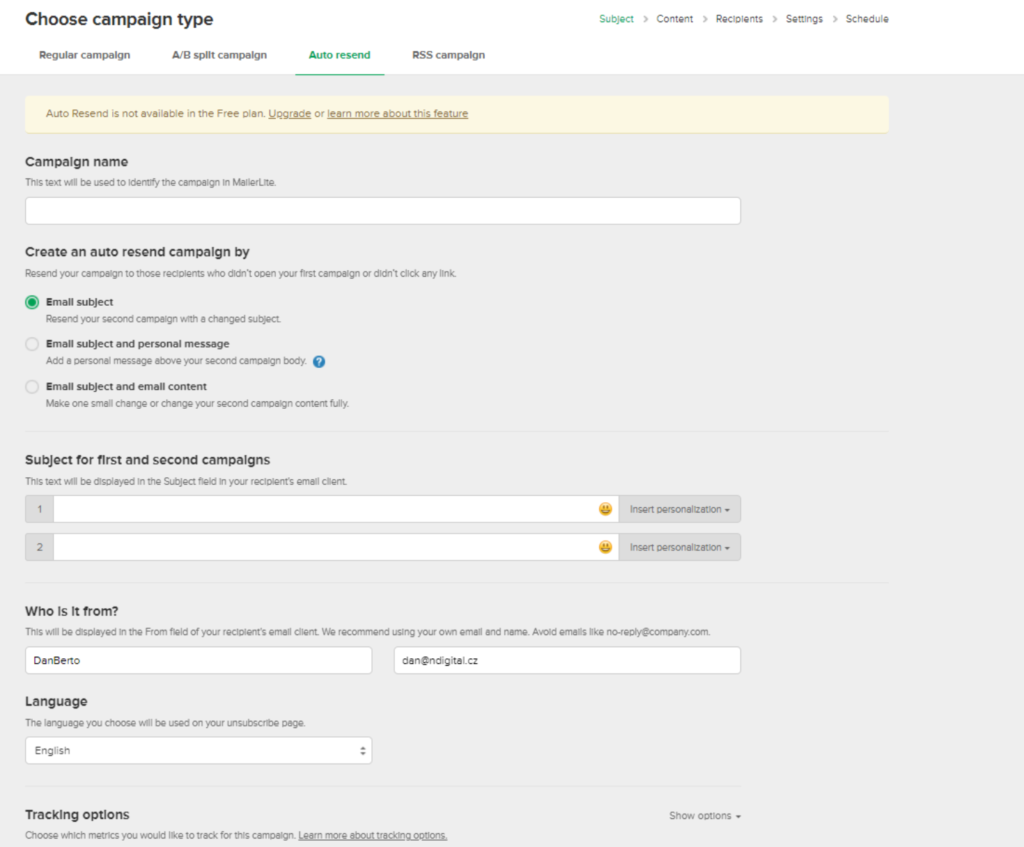
Basically, there is the same setup as with the campaigns before. If you want the second email to have different content, create two emails as in the A/B test. If you have two items, select only one. And if you want a message before the second email, type a message before selecting the second email.
After selecting the subjects, select on what basis the second email is sent, whether on a non-click or non-open. You will then see the campaign settings, check them, and you’re done.
After viewing the settings, set the time of sending before sending. Here, you set the time of sending the first and second email (this is a premium paid feature).
RSS campaigns
RSS campaigns are used to automatically send you a newsletter with new blog posts. You need an RSS feed URL for this. The website is then regularly checked, and the content of the email is updated with the latest blog posts. For this campaign, set the date, time, and frequency. In addition, you can set the subject to dynamically insert the title of the last post.
This is a very handy feature if you write blog posts regularly. It is easy to set up, so you don’t have to deal with this manually. You need an RSS feed. You can get this by typing /rss after your domain URL. Another specification in the editor is the RSS blocks you add to your email. This determines how many blog posts are displayed in the email. This feature is free in MailerLite.
Only one RSS feed per newsletter is allowed.
Automation
In MailerLite, automation is very easy to do. Just go to the
Automation tab and click on
Create workflow. This will take you to a map similar to the ones in MailChimp and Ecomail. The difference here is that you cannot move the elements freely.
I start automation with a trigger. There are six to choose from.
- When a subscriber is added to a group
- When the customer fills in the form
- When the subscriber clicks on the link
- When only the contact fields are updated
- When it’s the anniversary
- Specific date
If you have a connection to e-commerce, you have more options like abandoning the cart. Each of these triggers has individual settings. For each of these, MailerLite requires that it is clear which groups may be affected by the automation. For example, you can set it to automatically send an email on the person’s birthday.
Triggers must, of course, trigger events. Here we have four types of events:
- actions,
- time lags
- emails
- conditions
 Time lags
 have more possibilities than one might think. Not only that, but you can also set how much time elapses from the previous step. This can also be set in minutes, hours, days, and months. But you can also set the next step to trigger on a specific day of the week, month (for example, the 15th day), and year (that’s a specific date), and you can also set a specific time of day when the next step event will trigger.
The conditions are used to branch the “automation map” into two other parts. This is done based on whether or not the contact has met the condition we set. This can be:
- activity against another campaign
- activity in this automation
- membership of groups or segments
- whether any of the contact fields contain/do not contain anything.
You can create multiple rules for one condition – this work based on the “
and” and “
or” functions.
The
email event is used to send an email. You don’t need to have it preset; just fill in the title (that’s for you), subject, name, and sender. You then select the content and are taken to the email editor, where you can create it from scratch.
The
actions are a bit more complicated. It is divided into six other types, which you have to set again.
- Update contact field
- Copy a contact to another group
- Move to another group
- Remove from group
- Mark as unsubscribed (no longer part of automation -> workflow)
- Move to another step (this is good in combination with a condition)
Creating an automated workflow is very intuitive in MailerLite. Honestly, it’s not a biggie that you can’t move points around the “map”. In addition, Mailerlite tells you why it can’t run the workflow, so errors are very easy to fix.
The only criticism is that you cannot set multiple triggers for one workflow. Which, for example, is possible in Ecomail.
Sequence of emails
Email sequences are really easy to create. Just set up the automation properly. In addition, you can set up forms that can act as a trigger. MailerLite is therefore ideal for email sequences.
Return to cart
In case you have a connection to e-commerce, you can set up the return to the cart and insert products into the email. There is a special block for this ->
Abandoned cart block. Consult this guide if you need help with creating a cart abandonment sequence.
Creation of web pages
In MailerLite, you can easily create a website based on a template. You can choose from 14 templates to create from. Unfortunately, I didn’t find an option to start from scratch, and you have to follow one of the templates, which you can edit as you wish. And even in the official
MailerLite instructions, it only says
select and
template. Personally, I think it’s a pity, and I would certainly welcome such an option in the future.

The templates themselves are not bad and are relatively easy to work with. You have to choose it according to the purpose of the page. A blog template is definitely better for you when blogging than a Gym template. You will be pleased to know that you can jump between pages in one editor and save time.
In the pages section, you can choose which page you want to edit; you can also duplicate pages and create new ones. In the
Settings section, you set common elements across pages, such as styles and individual elements.
In the
Blocks section, you can add individual blocks, and the choice is quite wide. For example, you can add a questionnaire, a countdown, a map, tables, recent posts, etc. You can also insert HTML code here. There are more than enough options. Each of these blocks has its own setup that could be written about in a paragraph.
For me personally, this is a more user-friendly editor than the one for creating pages in
MailChimp (which has great editors in general). There are so many options in MailerLite regarding blocks; it’s unbelievable that it’s a free feature and it’s an emailing tool.
After creating the pages in the editor, you will be taken to the technical settings. Part of the URL contains .mailerpage.com; if you don’t want this in the URL, you have to pay for the service.
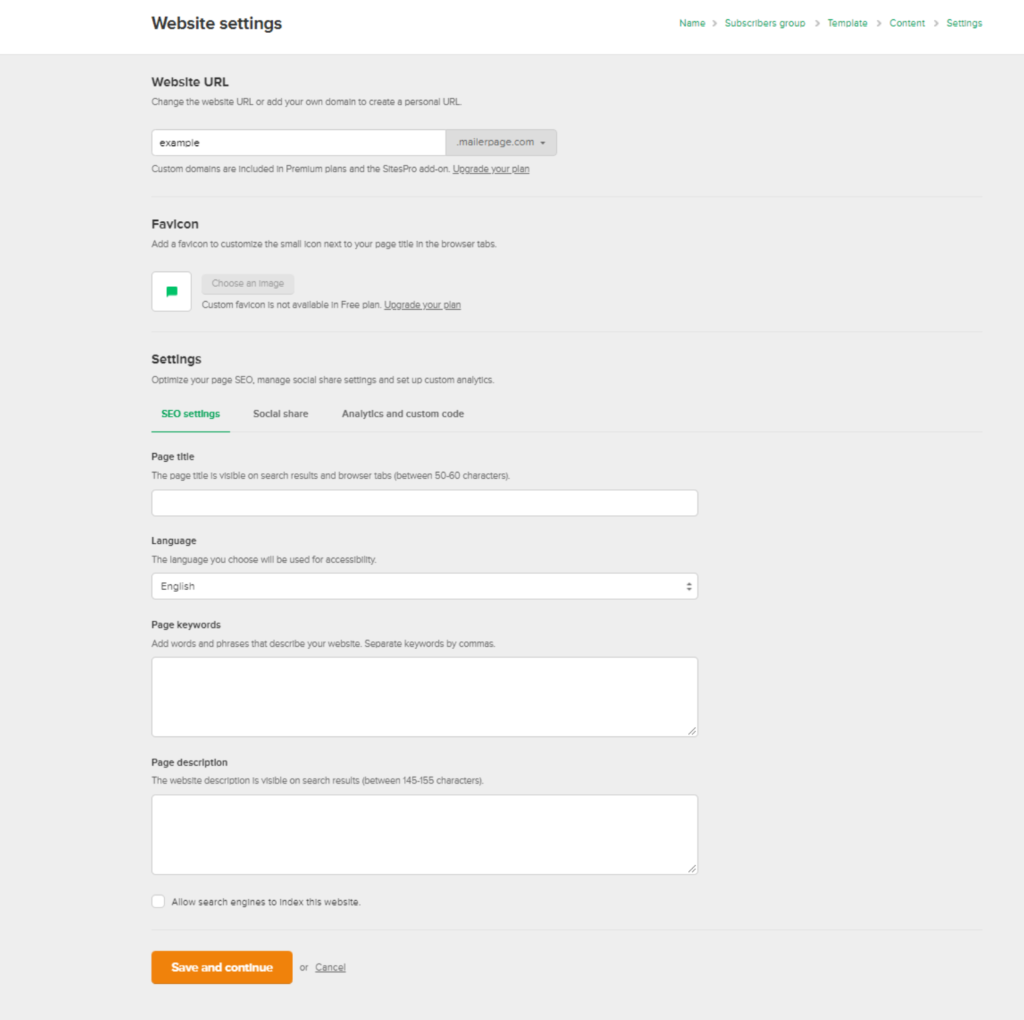
In this setting, you can also set up Google Analytics and insert the Facebook Pixel here (in the Analytics and custom code section). You can also start creating heatmaps based on where users click and insert custom HTML code in both <head> and <body>. You can also set up Social share. You will be very pleased to know that you can insert an image that will appear in a tab next to your page title.
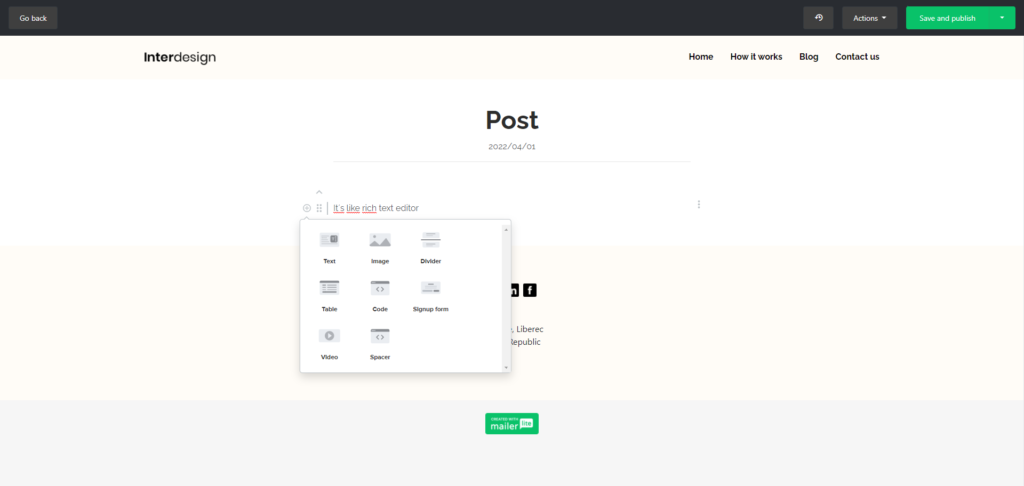
Another very positive feature is that you can create blog posts directly and don’t have to enter the editor and copy pages.
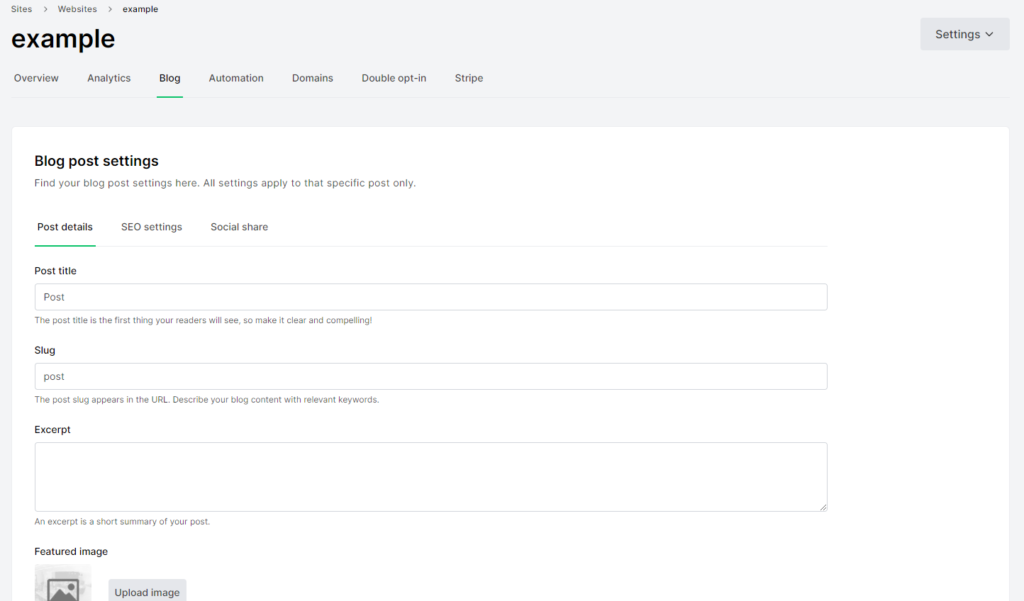
For blog posts, you can set up post details (e.g., thumbnail image), SEO, and social shares. The editor itself is the same as the rich-text editor.
You can then see your blog posts after publication on the blog page, where they are displayed through thumbnail images, descriptions, and title.

In general, creating websites on MailerLite is extremely easy. The only criticism is the inability to create from scratch and the necessity to use templates. On the other hand, you can delete individual blocks and ultimately customize it.
MailerLite provides you with a very easy way to create blog posts. You can easily implement other code on the site, so I don’t see why you can’t integrate Google tools, Smartlook, etc.
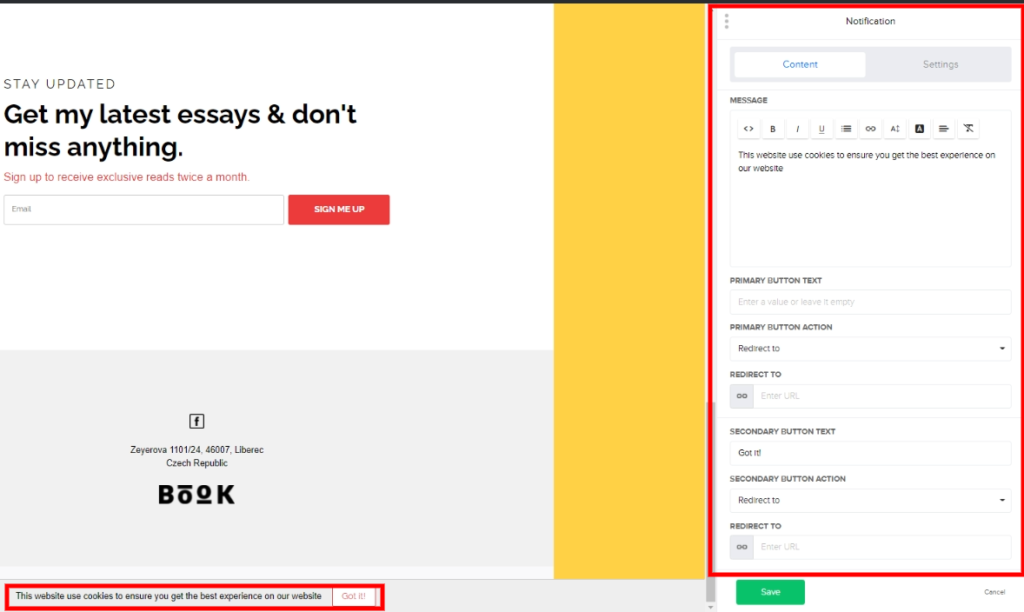
On the other hand, there is some controversy about the functionality of the cookie bar, which can be found in the
settings section of the editor under the
notification bar.
You also have a double opt-in option in your site settings. If you turn it on, you see a new section where you can set up a confirmation email, thank you message, email subject, and sender.
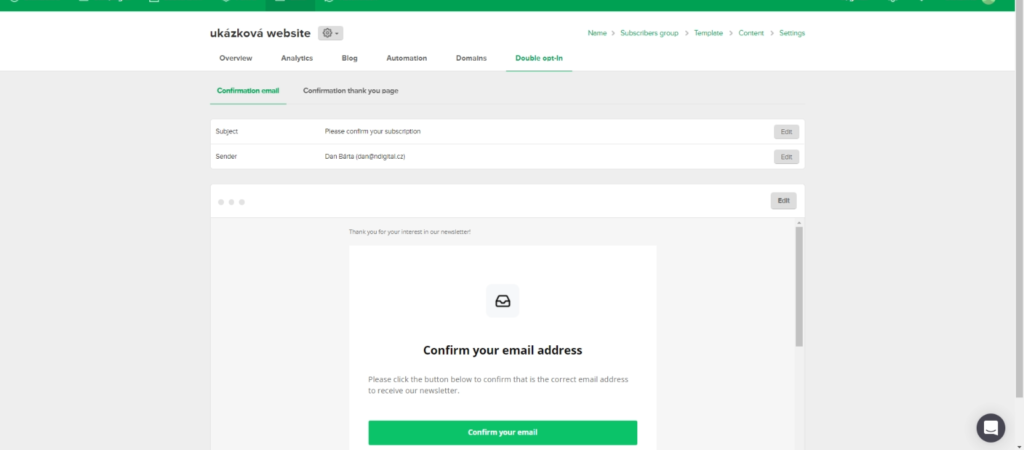
In this setting, you can also set up automation linked to your website.
Landing page
To create a landing page, see the
Sites tab. The first thing you do is select a name and then which group to add subscribers to. When creating, you have a choice of 44 templates, which you can edit as you wish.
Unfortunately, you can’t create beyond the templates from scratch. On the other hand, it’s nice to know that the editor is the same as when creating the site. The difference is that instead of editing several basic pages, you only edit the landing page and the thank you page. If you don’t know what to do, I recommend going to bed, so the next day is a smooth ride.
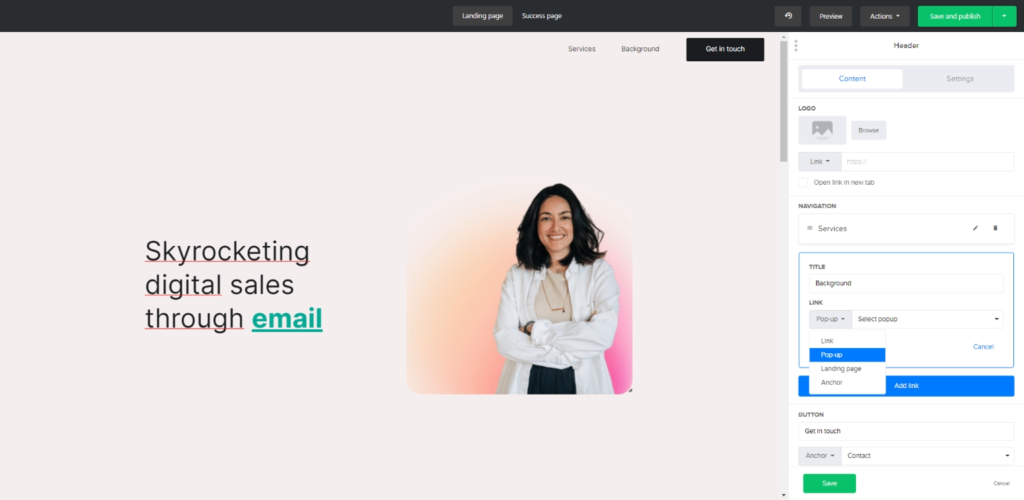
The Landing page consists of individual blocks that you can edit by clicking directly on them. For example, clicking on the header will take you to its settings, where you can enter your logo, or perhaps set it to display a pop-up window or go to your website when you click on individual headings.
You can access the individual block settings via the
save and
cancel buttons or by clicking on another block. Unfortunately, this is sometimes annoying when you intuitively click in the blanks and expect the setting to close.
Personally, I find working in the editor quite easy, and there is a wide selection of blocks you can add. It’s definitely more than in, say, the
MailChimp.
After creating the landing page design, you will be taken to the exact same settings as the website design. So, you set the URL, there is a fixed part www.subscribepage.com; this can be changed only in the paid version. Then you set up SEO, Social share, analytics, and custom codes. All these settings can be changed retroactively. You can change the landing page in the same way.
You can A/B test your landing page in MailerLite, but it is a paid feature.
Image editor
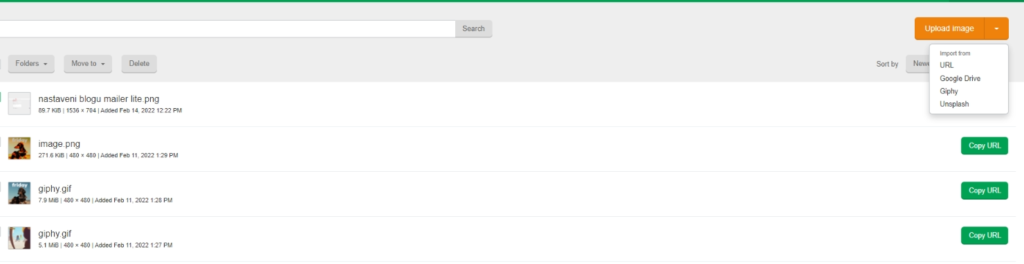
A great image editor in MailerLite can be accessed through any editor. The images can be found in the
File manager section, hidden in the drop-down bar next to your account name. In addition, you can upload images via URL, Google Drive, Giphy, and Unsplash. As you can see, you can also create a special folder for the images through the
folders button to better group and sort them.
The image editor itself can be accessed in the individual editors. Just click on the picture that is in one of the blocks. This will show you the image settings. You can add ALT, link, or open the editor through
Edit image. The editor itself includes basic image editing such as adding text, adjusting focus, saturation, etc.
The editor is very intuitive to use and is a great helper. It saves you the time of going to other tools outside of MailerLite and has enough options on its own to do the basics.
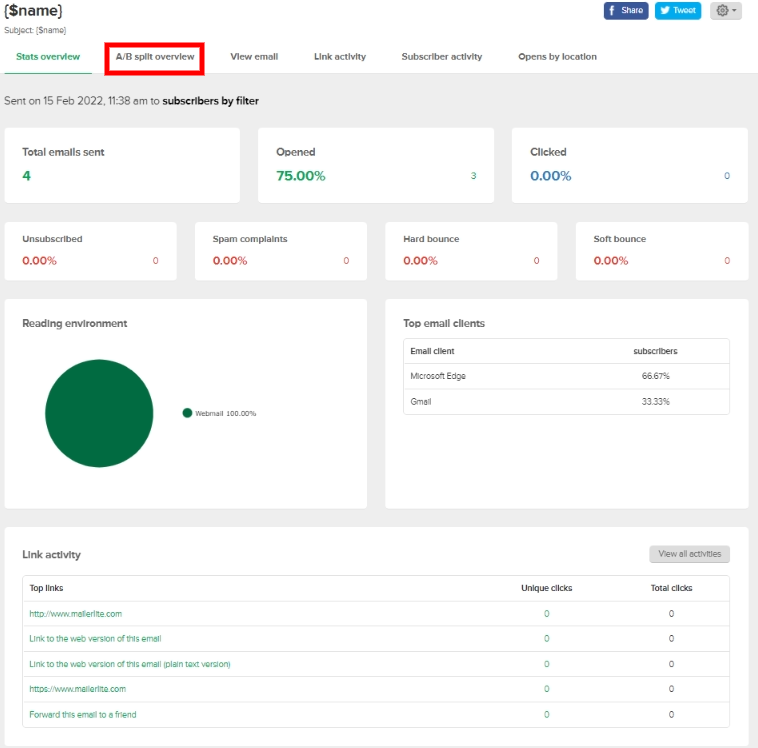
Reports
You don’t have a separate reports section. But the basic statistics can be found in the Dashboard. If you want to see the results of campaigns, just go to the
Campaigns tab, and there is a
View report button next to the sent campaigns. The statistics are tailored to the type of campaign. In the A/B test, for example, there is also an overview of how each version performed.
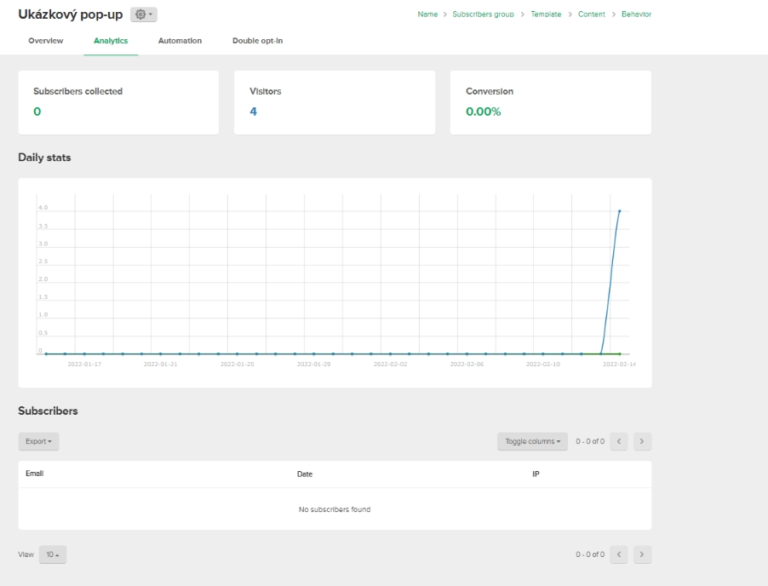
Report forms can be found in the
Forms section. However, there is no
View report button. But you have to click on the form itself, and then you have the
Analytics section. This is because forms practically evaluate only two data: visitors and subscribers and then their ratio.
As with forms, this is the same for
landing pages and sites created through MailerLite, only here, there are unique visits and visits. However, you can connect Google Analytics to it, so you may not care about the result.
As for the
workflows reports, you can find them in their tab after clicking each
workflow. Here, MailerLite will show you the statistics of the whole sequence and the statistics of the individual emails used in it, which you can click for a more detailed report.
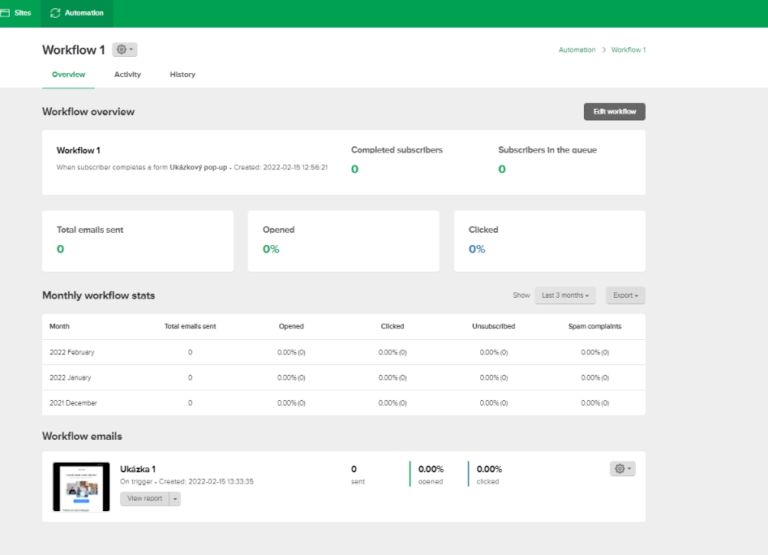
You can also view the activity associated with your sequence, for example, the number of users who have completed it. There is also an indication of how long it took them and the completion date.
Deliverability
The deliverability test shows that it has improved significantly over the last period. One of the best at the moment; if you want to check it out for yourself, read this
article. From the data you may be interested in, the deliverability to Gmail was 97%, but 81.5% of the emails ended up in the promotions section. The deliverability to Outlook and Hotmail was 95.7%.
You can also improve your deliverability through a dedicated IP address service, which MailerLite offers for €45 per month.
Price
MailerLite has one of the best free versions among email tools.
You can collect
up to 1,000 subscribers for free
and send out up to 12,000 emails per month + features are hardly limited at all.
Registration to MailerLite
free-of-charge HERE.
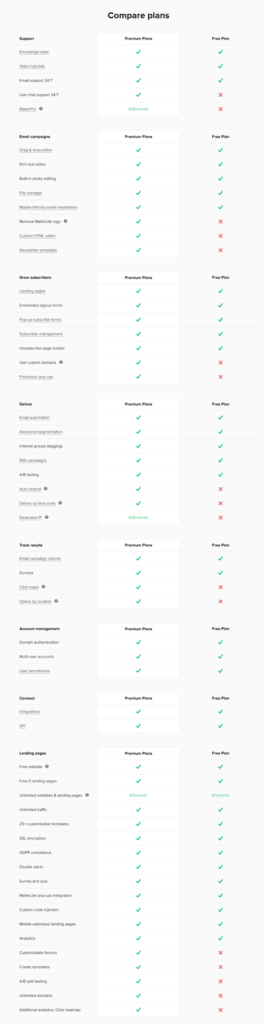
As you can see, it is possible to pay extra for additional bonus features in addition to the paid version. And you can also see that there are not so many differences, and everything you need for a small business or blogger is in the free version.
So, what is the price of MailerLite move above 1000 subscribers? The list can be found
here. If you want paid features for up to 1000 subscribers, it only costs 9 euros. You can send out unlimited emails for paid versions of up to 50,000 subscribers, then that’s 12x your plan maximum.
MailerLite will cost you less than Ecomail (and, of course, the much more expensive
Mailchimp). You can also price up to 600,000 contacts, and then you have the option to make arrangements.
You have the option to pay extra for bonus features:
SitesPro
This feature gives you an unlimited number of websites and landing pages that you can publish. It costs €9 per month.
Mailer Pro
With this feature, you get priority customer support via email and live chat all day, every day of the week. In addition, a dedicated administrator will help you import contacts, create templates, create GDPR-compliant forms, and analyze your results. This service costs €90 per month.
Dedicated IP address
Having an IP address reserved just for you can improve your deliverability. Your IP address is isolated from others, and you will create your reputation entirely on your own. The service is recommended if you send more than 50,000 emails per week. The monthly rate is €45.
Summary
Ideal tool for people who don’t need anything complex. You can put together almost everything you need, and everything is intuitive.
The free version is perfectly adequate and gives you almost all the same features as the paid ones, and much better than the free version of MailChimp. Deliverability has been improving over the past years, and it can be assumed that it will continue to do so. The paid versions are also very cheap and more cost-friendly than
MailChimp.
Otherwise, I can say that MailerLite is ideal for you if you don’t need more complex features, connections to systems, or complex automation.